Discussion
The idea of Selling Consignment is to track and sell material items that have been “lent” to the shop by a supplier.
Once the Consignment Material item is sold, the supplier then bills the shop for the Sold Consignment item (s) and usually replaces the Sold Consignment item (s) with a new “lent” Consignment item (s).
When the supplier billing occurs, the Consignment item (s) billed for are the Sold Consignment item (s), not the new “lent” Consignment item (s). The Supplier Invoice then requires reconciliation of the Sold Consignment item (s) and the inventory restock of the new “lent” Consignment item (s).
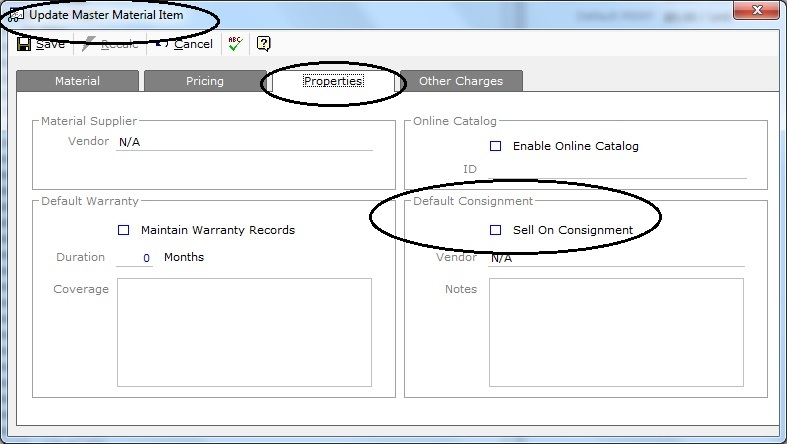
Consignment items are entered into inventory as normal stocking item (s) with one additional step. On the Properties Tab, check the box “Sell On Consignment” box. Once Stocked, at the Location Manager make sure to enter the Consignment Vendor (Supplier) within the Consignment area.
The Software system offers Consignment setup on each Material item either at the Master Material List and/or at the Location Material List.
Figure 1
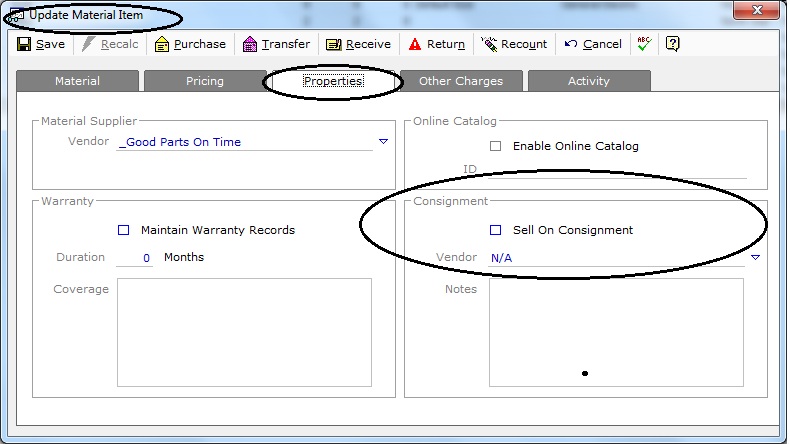
Figure 2
A Single Material Item can be set as Consignment at the Master Material List or Location Material List for any Location. (i.e. Location A stocks and Owns the Material Item. Location B stocks the item on Consignment). Simply check the Consignment box at the Location level where the Material Item is stocked as Consignment or at the Master Material List if all Locations stock the Material item as Consignment.
The system holds the value of the Inventory items in the 1420 Materials account. When the Consignment item (s) are setup, the system holds the value of the Consignment items in the 2130 Consignment Liability account.
The true value of your inventory would be the value of the 1420 Materials account minus the value of the 2130 Consignment Liability account.
1) From the Setup (Single Location) or Enterprise Manager (Multi Location), enter the New Master Material Item. Complete the New Master Material Item information as any normal inventory item including description, part #, core value and cost / sell pricing.
a) If you are a Single Location, select the Properties Tab on the Master Material Item and check the “Sell On Consignment” box in the Consignment area.
b) If you are a Multi Location review the 2 options below before setting your “Sell On Consignment” box.
i) If you are unsure if All Locations will be stocking the item (s) on Consignment.
Leave the “Sell On Consignment” box unchecked until you have stocked the item (s) at a Location, then check the “Sell On Consignment” box at the Location level for the Locations that will be stocking the item (s) as “Sell On Consignment.”
ii) If every Location in your Enterprise will be stocking the item (s) as “Sell On Consignment” then you can check the “Sell On Consignment” box at the Enterprise Manager, Master Material Item.
The Consignment setting at the Enterprise Manager, Master Materials List will make this item a Consignment Material Item by default at all locations if “Sell On Consignment” is checked prior to stocking the item.
The “Sell On Consignment” box can be checked or unchecked at any Location after being stocked.
![]() A Consignment Vendor / Supplier can only be set at the Location level after the item has been stocked.
A Consignment Vendor / Supplier can only be set at the Location level after the item has been stocked.
To setup Consignment information, each Material item is an individual entry and must be setup as such.
There is no Batch Update for Consignment setup.
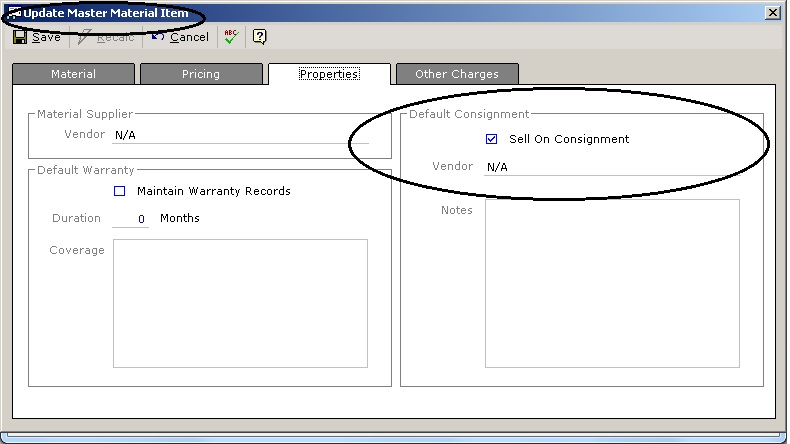
Figure 3
2) Stock the New Material Item (s) to your Location.
a) From the Location Manager or from the Reports Manager > Materials > Price Catalog > Master List.
3) At the Properties Tab, Ensure that the “Sell On Consignment” box is checked for all Consignment Item (s).
a) From the Smart Label ![]() select the Vendor (Supplier) that has “lent” you the Consignment Item (s).
select the Vendor (Supplier) that has “lent” you the Consignment Item (s).
b) Make sure all entries are complete for this Material Item. (i.e. Base Buy Price, Core Price, Sell Pricing, Sell On Consignment and Consignment Vendor/Supplier).
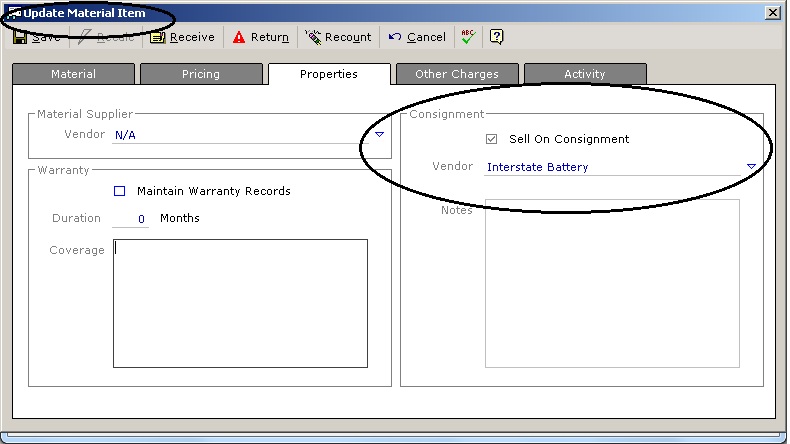
Figure 4
1) Initial Stock / Opening Inventory for Consignment Material items.
a) DO NOT RECOUNT CONSIGNMENT ITEMS FOR INITIAL STOCK / OPENING BALANCE ENTRIES.
b) Use the Receive option on the Material Item record.
i) Complete the “Receive To Inventory” entries.
(§) From the Smart Label, select the Consignment Supplier.
(§) At the SI# (Supplier Invoice Number), enter “consignment”
(§) Complete all entries in the Details area:
§ Received = current In Stock Quantity
§ Cost = current individual item cost
(§) Select “Add To Supplier Invoice” @ top left.
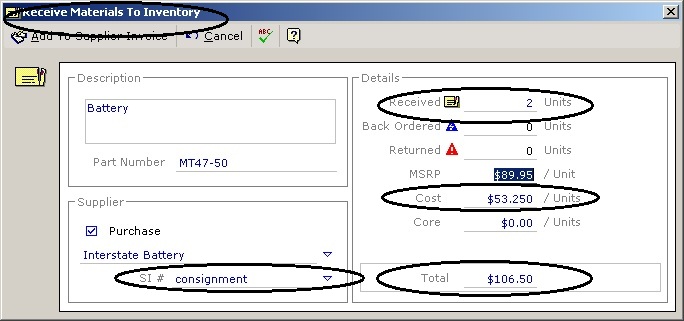
Figure 5
c) The system will create an entry for the “lent” Consignment Items under the Purchases Manager | Purchase Orders | Consignment Slips.
i) Each Supplier will hold its own Consignment Supplier Invoice “consignment” in the Consignment Slips.
ii) The Consignment Slips module is no more than a “Posted Note”.
§ There is no management or maintenance needed for the Consignment Slips.
iii) The Activity Tab on that Material Item provides detailed and accurate information for all purchases, sales and other activity for all Material Items.
d) The value of the Consignment Item (s) is now entered into the following GL accounts:
i) 1420 – Materials
ii) 2130 - Consignment Liabilities
Discussion
When a Customer Invoice or Counter Sale that has a Consignment Item on it is posted, a Supplier Invoice is automatically created for the number of consignment items sold under the Purchases Manager | Purchase Orders | Supplier Invoices, for the Consignment Supplier. Any subsequent Consignment Item (s) sold will append to this Supplier Invoice “consignment”.
The system will use the Original Supplier Invoice # that was used when receiving the “lent” Consignment Items into inventory as shown in Figure 5, “consignment”.
This Supplier Invoice corresponds to what is now owed to the Supplier for the “lent” Consignment Items that have been sold, and should correspond to the Supplier Invoice you will receive when the Supplier replenishes the Consignment items and bills for the Sold Consignment Item (s).
1) Receive the Replacement “lent” Consignment Item (s) into Inventory. (Figure 5). Depending on if you have set your Consignment Inventory Items up for Inventory Reorders, (Reorder Points) follow the options below.
To receive Consignment Items from an Inventory Reorder – Purchase Order, use option (a.) below.
To receive Consignment Items manually, use option (b.) below.
Use the Inventory Reorder List to produce a list of required Consignment Inventory Item (s).
From the Purchases Orders, verify and receive the “lent” Consignment Items into inventory.
Make sure to use “consignment” as the Supplier Invoice for the new “lent” Consignment Items being received. (Figure 5)
Use the Receive option on the Material Item.
Complete the “Receive To Inventory” entries.
From the Smart Label, select the Consignment Supplier.
At the SI# (Supplier Invoice Number), enter “consignment.”
Complete the Details as needed. Make sure that all information is correct.
Select “Add To Supplier Invoice” @ top left.
2) Processing the Supplier Invoice for the Sold Consignment Item (s)
![]() The inventory system uses FIFO (First In, First Out). This means that the oldest item entries will be used as items are sold. Supplier Invoices may represent an updated Cost for the items. Edits to the Supplier Invoice may be required.
The inventory system uses FIFO (First In, First Out). This means that the oldest item entries will be used as items are sold. Supplier Invoices may represent an updated Cost for the items. Edits to the Supplier Invoice may be required.
a) Use the Supplier Invoice under the Purchases Manager | Purchase Orders | Supplier Invoices for the Consignment Supplier.
b) Right Click on the “consignment” invoice, select Update.
Use the Supplier Invoice under the Purchases Manager | Purchase Orders | Supplier Invoices for the Consignment Supplier.
Right Click on the “consignment” invoice, select Update.
The items on the Supplier Invoice “consignment” should correspond with the items on the Supplier Invoice. These will identify the Sold Consignment Item (s), Quantities and Cost Prices as entered when received in inventory.
![]() If the Supplier Invoice Consignment information does not match the Supplier Invoice, there are several options to correct and reconcile the Supplier Invoice. Review the options below to edit and correct the entries to match the Supplier Invoice Consignment Information to the Supplier Invoice.
If the Supplier Invoice Consignment information does not match the Supplier Invoice, there are several options to correct and reconcile the Supplier Invoice. Review the options below to edit and correct the entries to match the Supplier Invoice Consignment Information to the Supplier Invoice.
Make sure to double check all entries for matching Part #, Quantities and Item Costs to the Supplier Invoice.
If All Items match the Supplier Invoice and the Total is correct:
Select Tools | Invoice Number and edit the Supplier Invoice Number to match the Supplier Invoice number.
Verify the Date @ Top Right, Edit if needed.
Select Post To Accounts Payable @ Top Left
If Item (s) part numbers are a match but the Cost does not match the Supplier Invoice:
Highlight the item
Select Tools | Update Item
Edit the Cost to match the Supplier Invoice.
If there are items on the “consignment” Invoice that are not on the Supplier Invoice:
Highlight the item (s) on the Supplier Invoice, one at a time.
Select Tools | Update item.
Edit the SI# to match the Supplier Invoice #.
Edit the Cost to match the Supplier invoice, if needed.
Select, Add To Supplier Invoice @ Top Left.
Complete item edits as needed.
This will create a new Supplier Invoice under the Supplier. Once all edits are completed, select close on the current Supplier Invoice.
Select Refresh for the screen to present the new Supplier Invoice.
Right Click and select Update on New Supplier Invoice. Verify all entries.
Verify the Date @ Top Right, Edit if needed.
Select “Post To Accounts Payable.”
The additional items not included on this Supplier Invoice will be left on the “consignment” Invoice for future processing.
![]() Remember, only those Consignment items from a Posted Customer Invoice will move to the Purchases | Supplier invoices. If an item is missing, it might be on an Unposted Customer Invoice in the Work In Progress screen.
Remember, only those Consignment items from a Posted Customer Invoice will move to the Purchases | Supplier invoices. If an item is missing, it might be on an Unposted Customer Invoice in the Work In Progress screen.
![]() Process all Consignment quickly in order to keep the Consignment current and up to date. Best practice is to Receive the new “lent” item (s) into Inventory then process the Supplier Invoice for the Sold item (s).
Process all Consignment quickly in order to keep the Consignment current and up to date. Best practice is to Receive the new “lent” item (s) into Inventory then process the Supplier Invoice for the Sold item (s).
![]() There might be times where items are on the “consignment” invoice and are not on the Supplier Invoice. This is when additional Consignment Item (s) are sold between processing the Supplier Invoice. Following the instructions for #3 above will ensure accuracy in processing and posting these invoices.
There might be times where items are on the “consignment” invoice and are not on the Supplier Invoice. This is when additional Consignment Item (s) are sold between processing the Supplier Invoice. Following the instructions for #3 above will ensure accuracy in processing and posting these invoices.