All Return Items (Cores and Return Parts) awaiting credit (including those items already returned to the supplier where a Credit Slip has not been received) must be entered into the Returned Goods Awaiting Pickup Bins for the appropriate Supplier prior to your Go Live Date.
When the Supplier Credit Slip(s) are received, the Credit Slip(s) will be processed through the software system.
A Returned Goods Awaiting Pickup Bin can only be opened when an Item has been identified as Returned and moved to the Returned Goods Awaiting Pickup Bin for the Supplier it was purchased from.
![]() Notes:
Notes:
For the entries you will need the Part Number, Description, Cost, Quantity and Supplier.
The Returned Goods Awaiting Pickup manager will only display suppliers where returns are in the Returned Goods Awaiting Pickup Bin (RGB).
A Returned Goods Awaiting Pick Bin must be opened to enter the Return Goods Opening Balances.
1) From the Work In Progress screen, look to see if there is a Un-posted Counter Sale for “Return Parts” or “Part Returns.”
a) If so, open this Counter Sale and skip to Step 2.
b) If there is not an Un-posted Counter Sale for “Return Parts” or “Part Returns”, start a New Counter Sale.
i) Lookup or Add a New Business Contact “Return Parts” or “Part Returns.”
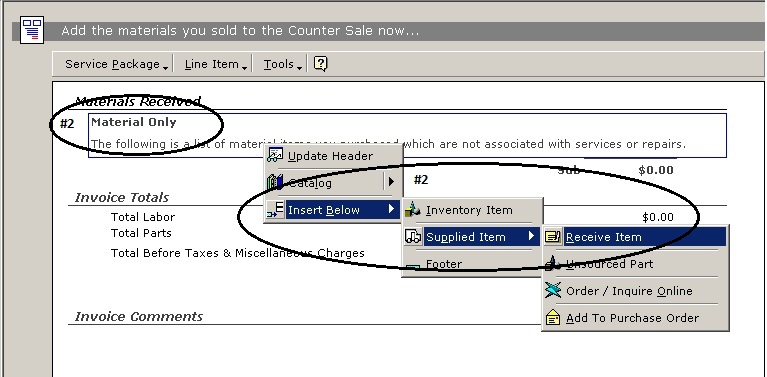
Figure 1
2) At the Materials Only line, Right Click, select Insert Below | Supplied Item | Receive Item.
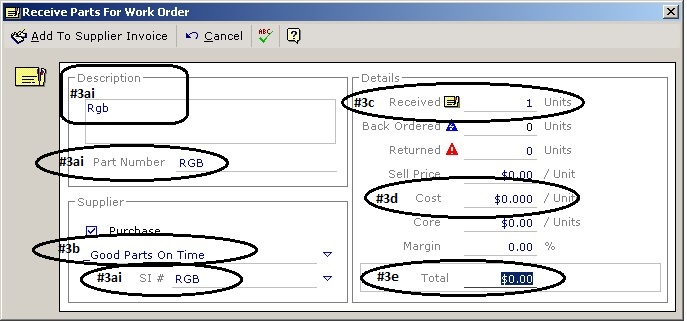
Figure 2
3) Complete the “Receive Parts for Work Order” fields:
a) Use RGB (Return Goods Bin) for all entries as shown.
i) Description, Part Number and SI# (Supplier Invoice Number).
b) Be sure to select the Supplier, from the Smart Label, that you will be entering Return Goods Item for.
c) Use a Quantity of 1.
d) At the Cost, enter $0.00 as there will be no values on this entry.
e) Make sure that the Total for this entry is $0.00.

Figure 3
4) Select “Add To Supplier Invoice” at Top Left.
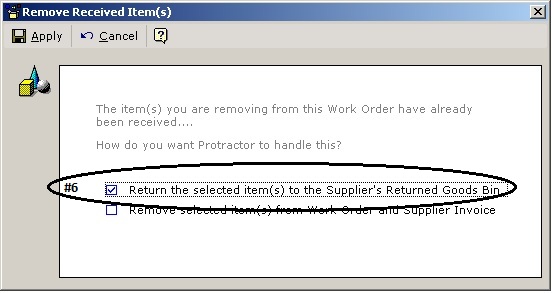
Figure 4
5) Right Click on the Material Item and select “Remove Material”.
6) When prompted for the Remove Received Item (s), check the “Return the selected item (s) to the Supplier’s Return Goods Bin”.
7) Repeat this process for each Supplier that requires Return Good Opening Balance entries.
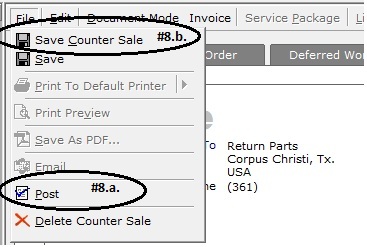
Figure 5
8) Close the Counter Sale and Save the Changes by either:
a) Posting the Counter Sale with no values or,
b) Save as an Un-posted Counter Sale for future use.
![]() Following this process will open a Returns Good Awaiting Pickup bin for each Supplier from above entries. There will be no effect on the General Ledger as all entries have a $0.00 value.
Following this process will open a Returns Good Awaiting Pickup bin for each Supplier from above entries. There will be no effect on the General Ledger as all entries have a $0.00 value.
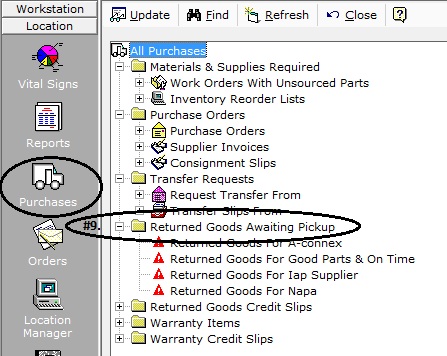
Figure 6
9) From the Purchases Manager, open the Returned Goods Awaiting Pickup module.
10) Open the Return Goods For “The Supplier (s).”
a) Right Click, select Update.
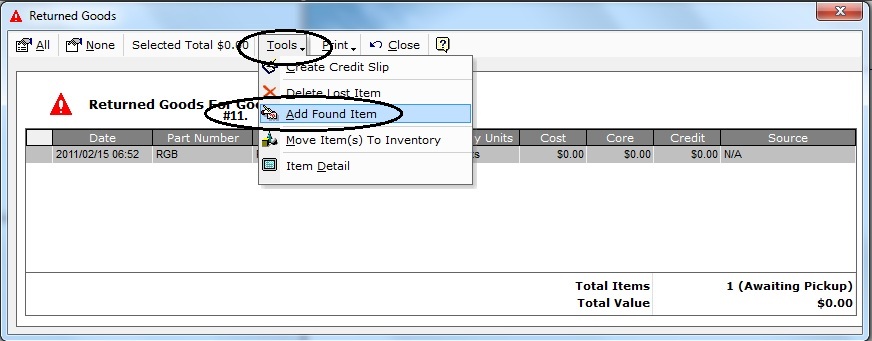
Figure 7
![]() In the Returned Goods Awaiting Pickup Bin you will see the RGB item processed above. This was required to open the Returned Goods Awaiting Pickup Bin for the supplier.
In the Returned Goods Awaiting Pickup Bin you will see the RGB item processed above. This was required to open the Returned Goods Awaiting Pickup Bin for the supplier.
11) From the Tools menu, select Add Found Item.
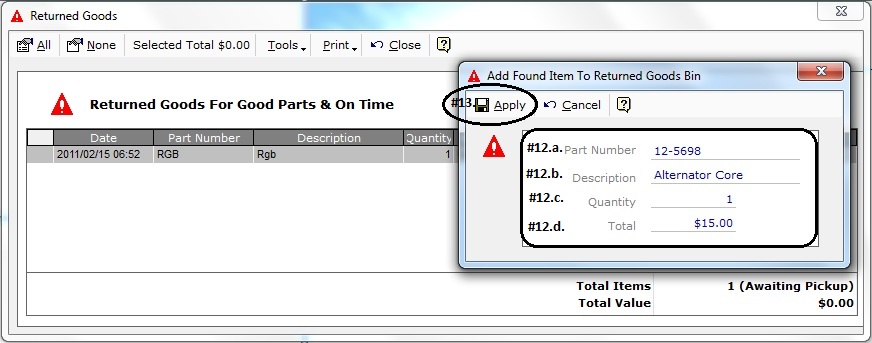
Figure 8
12) Complete the Add Found Item To Returned Goods Bin fields.
a) Part Number
b) Description
c) Quantity
d) Total
13) Select Apply.
14) Repeat this process for each Return Item for this Supplier.
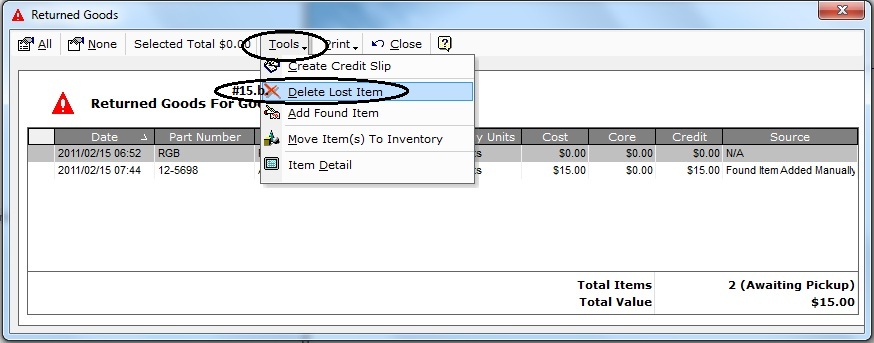
Figure 9
15) Once all Item entries are completed for this Supplier,
a) Highlight the RGB Item.
b) From the Tools menu select, Delete Lost Item.
![]() Note:
Note:
Enter each item Quantity and Total using Pre Tax (no tax) values.
These values will be entered into the 4415 – RGB Growth (Found Items) GL Account and will report Revenue on the Income Statement.
Your Return Items are now properly entered into the Supplier Return Bin awaiting the Supplier Credit Invoice.