 Print Documents (11:40)
A check template is a document that is used for printing checks.
Before reading this article, consider watching this video:
Follow these steps to add or edit a check template:
To access print documents, click on the Setup button in the ribbon and then click Print Documents in the left window pane as shown in this figure:
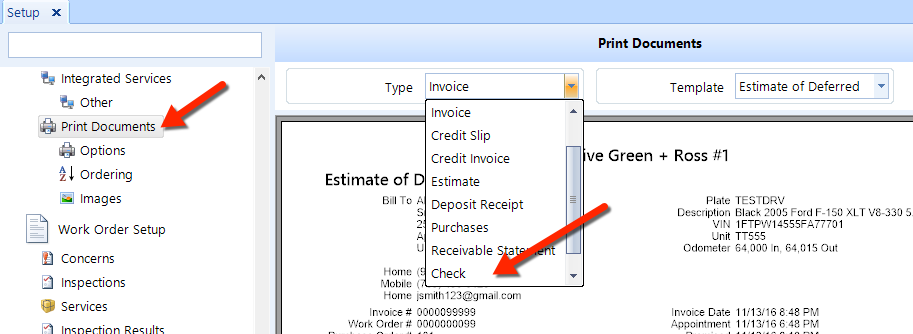
From the Type drop-down list, choose the Check document type (see the figure above).
To add a template, click the Add button in the ribbon.
To edit an existing template, choose it from the Template drop-down list and click the Edit button in the ribbon.
The document editor popup will open and a preview of the existing template will appear in the right window pane (see the figure below).
In the sections below, we explain how to edit all of the properties for the template.
As shown in the figure below, click the Load button to load a file from your file system that has preconfigured settings for your document.
Click Export to place your document settings into a file that you can later import (using the Load button).
From the drop-down list, choose the level of Zoom that you want to see in the preview window.
Click Undo to discard any changes that you have made to the document since the last save.
Click OK to save the template and exit, or click Cancel to discard all of your changes and exit.
You can edit the following in this section.
Name: The name of the document, or template, as it will appear in the templates list once saved.
Description: The description you wish to give to the document to explain its purpose. It does not appear anywhere on the document itself and is for reference only
Page Setup – click this button to open a popup window in which you can edit the following:
Paper Size: choose either a letter or legal paper size.
Margins: You can set the left, right, top and bottom margins of the page in inches
Orientation: choose either portrait or landscape.
Click OK to save your changes, or click Cancel to discard.
Style – from the drop-down list, choose check style you want to use:
Standard - Prints three checks per page without stubs
Voucher - Prints one check per page with two stubs
Top Gap – the space (inches) that you wish to leave at the top of each form.
Date Format – choose a format for the check date.
Check Date – the size and position of the placement of the date.
Box 1 = width
Box 2 = height
Box 3 = X coordinate
Box 4 = Y coordinate
Text Amount – the size and position of the amount text.
Box 1 = width
Box 2 = height
Box 3 = X coordinate
Box 4 = Y coordinate
Check the box for Append stars to text amount to display a series of asterisks at from the end of the amount to the end of the width setting.
Amount – the numeric amount of the check.
Box 1 = width
Box 2 = height
Box 3 = X coordinate
Box 4 = Y coordinate
Pay To – the name of the person or company being paid.
Box 1 = width
Box 2 = height
Box 3 = X coordinate
Box 4 = Y coordinate
Address – the address of the person or company being paid.
Box 1 = width
Box 2 = height
Box 3 = X coordinate
Box 4 = Y coordinate
Check Height (Standard Style Only) – the overall height of each check on the form.
First Stub (Voucher Style Only) – the size and position of the first stub.
Box 1 = width
Box 2 = height
Box 3 = X coordinate
Box 4 = Y coordinate
Second Stub (Voucher Style Only) – the size and position of the second stub.
Box 1 = width
Box 2 = height
Box 3 = X coordinate
Box 4 = Y coordinate