The Software was designed to work seamless with a number of electronic catalogs using modern communication tools. As a result, the integration of the catalogs with the work order system is very unique and powerful.
Before you can use the catalog, you must identify the vehicle's year,
make, model, and engine. The ![]() icon allow
you to quickly enter the vehicle information on one dialog or you can
use the smart labels beside each field. A quick list of the last 25 vehicles
you looked up is provided under the vehicle information. When
using the catalog within the work order, the vehicle card will automatically
pass the information to the catalog when using Epicor (formerly Activant)
or NAPA. NAPA will require that you enter the vehicle information specific
to their vehicle table listings. This is only required the first time
you use the catalog for that vehicle. Subsequent lookups will remember
the information.
icon allow
you to quickly enter the vehicle information on one dialog or you can
use the smart labels beside each field. A quick list of the last 25 vehicles
you looked up is provided under the vehicle information. When
using the catalog within the work order, the vehicle card will automatically
pass the information to the catalog when using Epicor (formerly Activant)
or NAPA. NAPA will require that you enter the vehicle information specific
to their vehicle table listings. This is only required the first time
you use the catalog for that vehicle. Subsequent lookups will remember
the information.
![]() To Search for a Labor Operation from
an existing labor line item.
To Search for a Labor Operation from
an existing labor line item.
On the Work Order editor screen, double click the Labor Line Item to open the update labor line item dialog.
Click the Labor Guide button on the toolbar to open the labor guide dialog.
If you have a preset labor search configured, you will be presented with the labor operations and times. If not, either type in a text search in the Guide Search field or navigate the Category/Group/Description drop down menus on the right side of the window.
Click on the labor operation you require. If there are multiple option for the job such as air conditioning interference, hold down your CTRL key while selecting them. See example below.
Click on Apply to update the work order with the labor descriptions and time.
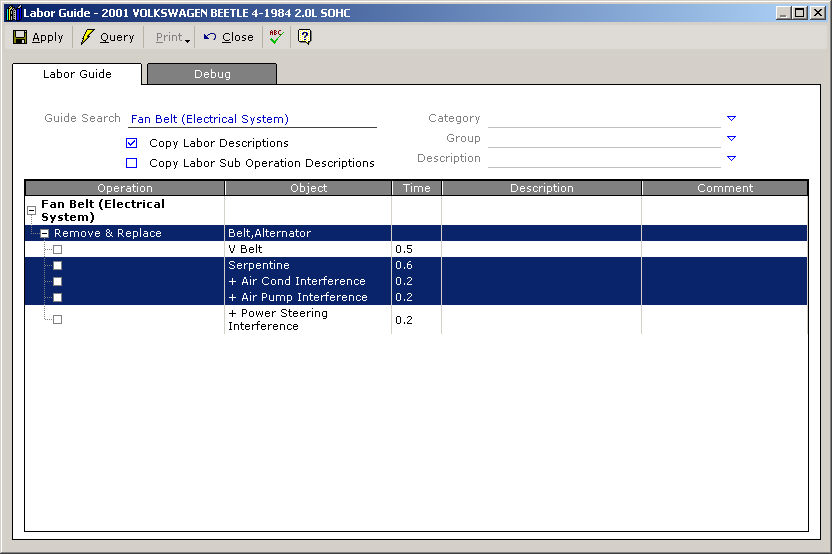
![]() Tip:
There are two options available to you when applying labor to the
work order from the labor guide. They are to copy
labor descriptions and copy
labor sub operation descriptions. These options are located
directly beneath the Guide Search field. By default, copy labor descriptions
is checked and copy labor sub operation descriptions is not.
Tip:
There are two options available to you when applying labor to the
work order from the labor guide. They are to copy
labor descriptions and copy
labor sub operation descriptions. These options are located
directly beneath the Guide Search field. By default, copy labor descriptions
is checked and copy labor sub operation descriptions is not.
![]() To Insert a New Labor Line Item and
Search the Labor Guide.
To Insert a New Labor Line Item and
Search the Labor Guide.
Right click on an existing line item within the service package.
Choose either insert above or insert below depending on where you want the new item to appear relative to the item you selected in step 1.
Choose Labor.
A new Update Labor Line Item dialog will appear. Click on the Labor Guide button.
Either type in a text search in the Guide Search field or navigate the Category/Group/Description drop down menus on the right side of the window.
Click on the labor operation you require. If there are multiple option for the job such as air conditioning interference, hold down your CTRL key while selecting them. See example below.
Click on Apply
to update the work order with the labor descriptions and time.
![]() Tip:
There are two options available to you when applying labor to the
work order from the labor guide. They are to copy
labor descriptions and copy
labor sub operation descriptions. These options are located
directly beneath the Guide Search field. By default, copy labor descriptions
is checked and copy labor sub operation descriptions is not.
Tip:
There are two options available to you when applying labor to the
work order from the labor guide. They are to copy
labor descriptions and copy
labor sub operation descriptions. These options are located
directly beneath the Guide Search field. By default, copy labor descriptions
is checked and copy labor sub operation descriptions is not.
![]() To Search the Labor Guide (Stand
Alone Catalog)
To Search the Labor Guide (Stand
Alone Catalog)
Click the Labor Guide button on the toolbar to open the labor guide dialog.
Either type in a text search in the Guide Search field or navigate the Category/Group/Description drop down menus on the right side of the window.
The labor operations and times are displayed.
![]() Labor
Search Tour (Stand
Alone Catalog)
Labor
Search Tour (Stand
Alone Catalog)
![]() To Search
for a Part from an existing material line item.
To Search
for a Part from an existing material line item.
On the Work Order editor screen, double click the Material Line Item to open the update material line item dialog.
Click the Catalog button on the toolbar to open the Catalog dialog. If you have multiple catalog user ID's configured, select the catalog you wish to use.
If you have a preset part search configured, you will be presented with the parts available that match the application. If not, either type in a text search in the Catalog Search field or navigate the Category/Group/Description drop down menus on the right side of the window.
If the part description is underlined, additional information is available via Epicor (formerly Activant)'s Cover to Cover feature. Information includes: pictures, OEM part numbers, specifications, warranty, etc. Simply click on the description to launch it.
Click on the part you require. The quantity will default to the PC (Per Car Quantity).
Click on Apply to update the work order with the part number, description and suggested selling price. If the part number is found in inventory the part will be drawn from inventory automatically.
![]() Tip:
There are three options available to you when applying parts to the
work order from the catalog. They are to copy
part descriptions, copy
parts pricing and copy parts
quantity. These options are located directly beneath the Catalog
Search field. By default, they are both checked.
Tip:
There are three options available to you when applying parts to the
work order from the catalog. They are to copy
part descriptions, copy
parts pricing and copy parts
quantity. These options are located directly beneath the Catalog
Search field. By default, they are both checked.
![]() Time Saver:
You can also right click on the item and choose the catalog to use.
This saves you from having to open the material item dialog and then
save it when exiting the catalog.
Time Saver:
You can also right click on the item and choose the catalog to use.
This saves you from having to open the material item dialog and then
save it when exiting the catalog.
![]() To Insert
a New Material Line Item and Search the Catalog.
To Insert
a New Material Line Item and Search the Catalog.
Right click on an existing line item within the service package.
Choose either insert above or insert below depending on where you want the new item to appear relative to the item you selected in step 1.
Choose Supplied Item then Unsourced Part.
A new Update Material Line Item dialog will appear.
Click the Catalog button on the toolbar to open the Catalog dialog. If you have multiple catalog user ID's configured, select the catalog you wish to use.
Either type in a text search in the Catalog Search field or navigate the Category/Group/Description drop down menus on the right side of the window.
If the part description is underlined, additional information is available via Epicor (formerly Activant)'s Cover to Cover feature. Information includes: pictures, OEM part numbers, specifications, warranty, etc. Simply click on the description to launch it.
Click on the part you require. The quantity will default to the PC (Per Car Quantity).
Click on Apply to update the work order with the part number, description and suggested selling price. If the part number is found in inventory the part will be drawn from inventory automatically.
![]() Tip:
There are three options available to you when applying parts to the
work order from the catalog. They are to copy
part descriptions, copy
parts pricing and copy parts
quantity. These options are located directly beneath the Catalog
Search field. By default, they are both checked.
Tip:
There are three options available to you when applying parts to the
work order from the catalog. They are to copy
part descriptions, copy
parts pricing and copy parts
quantity. These options are located directly beneath the Catalog
Search field. By default, they are both checked.
![]() To Search for a Part (Stand
Alone Catalog)
To Search for a Part (Stand
Alone Catalog)
Click the Parts Catalog shortcut.
Choose the ePartExpert Catalog.
Either type in a text search in the Catalog Search field or navigate the Category/Group/Description drop down menus on the right side of the window.
The parts information will be displayed.
![]() Part
Search Tour (Stand Alone
Catalog)
Part
Search Tour (Stand Alone
Catalog)
![]() Using All Lines. (Check Other Manufacturer
Lines in the Entire Catalog)
Using All Lines. (Check Other Manufacturer
Lines in the Entire Catalog)
Select the part number you wish to check other product lines against.
Click the smart label on the Query button.
Click All Line.
Select all the lines you wish to query on by clicking in the corresponding boxes.
Click Apply. The cross referenced line items will be displayed.
![]() Using Interchange (Parts Cross-Referencing
Utility)
Using Interchange (Parts Cross-Referencing
Utility)
Interchange is used to cross-reference part numbers. This can be a useful tool if you have a competitive part that has been taken off the vehicle. An example might be an OEM belt or a Gates belt and your supplier stocks Dayco.
From the Parts Catalog Tab
Right click the part number.
Choose Interchange.
The part numbers that cross-reference to the selected part are displayed.
From the Interchange Tab
In the Search field, type the part number and then press enter.
The part numbers that cross-reference to the selected part are displayed.
Click on the part number for the application and then click Apply to return the information back to the work order.
Tire Fitment provides the standard tire sizes for the vehicle models, Lug Nut Torque Ft/Lbs, inflation and rim width.
Open the catalog and click the Tire tab. The standard tire fitment information for the selected vehicle will be displayed.
To search your inventory for tires in that size, select the tire size, right click and choose Search Inventory.
![]() Tip: The Software can provide you
with tire price lists from your tire supplier. Ask your local representative
for details.
Tip: The Software can provide you
with tire price lists from your tire supplier. Ask your local representative
for details.
![]() To check pricing and availability:
To check pricing and availability:
Search for the parts in the catalog as per normal.
Click the box under the C column for each part your want to check. Or, click the heading box for the entire manufacturer to select all parts.
Choose
the online supplier from the Supplier
drop down list.
![]() When using the master list as a
supplier, only pricing is provided.
When using the master list as a
supplier, only pricing is provided.
Click on the Check Availability button.
If the part is found in the local inventory, the I column box will be selected. If you do not have enough quantity to satisfy the application the checkbox will be magenta.
If the part is found at the supplier specified through online ordering, the O column box will be selected and your pricing from the supplier will be returned. The sell price defaults will calculate your selling prices if implemented. When the parts are found in the supplier's distribution center or warehouse, the O will display a magenta W. When the part is found at another store within their network, the O will display a blue N.
If the supplier has an alternate part for the application, it will be listed directly below the part you inquired on and will be blue in color.
Click Apply to return the part and pricing information back to the work order. The quantity will default to the PC (Per Car Quantity).
![]() To Search
for a Part from an existing material line item.
To Search
for a Part from an existing material line item.
![]() Important:
The first time you look up parts using the Napa Catalog, you will
require to link the software's vehicle card to the Napa vehicle card.
You will be prompted a dialog is provided with the existing vehicle
information to help.
Important:
The first time you look up parts using the Napa Catalog, you will
require to link the software's vehicle card to the Napa vehicle card.
You will be prompted a dialog is provided with the existing vehicle
information to help.
On the Work Order editor screen, double click the Material Line Item to open the update material line item dialog.
Click the Napa Catalog button on the toolbar to open the Catalog dialog.
If you have a preset part search configured, you will be presented with the parts available that match the application. If not, either type in a text search in the Catalog Search field or navigate the Category/Group drop down menus on the right side of the window.
If the part description is underlined, additional information such as images. Simply click on the description to launch it.
Click on the part you require. The quantity will default to the PC (Per Car Quantity).
Click on Apply to update the work order with the part number, description and suggested selling price. If the part number is found in inventory the part will be drawn from inventory automatically.
![]() Tip:
There are three options available to you when applying parts to the
work order from the catalog. They are to copy
part descriptions, copy
parts pricing and copy parts
quantity. These options are located directly beneath the Catalog
Search field. By default, they are both checked.
Tip:
There are three options available to you when applying parts to the
work order from the catalog. They are to copy
part descriptions, copy
parts pricing and copy parts
quantity. These options are located directly beneath the Catalog
Search field. By default, they are both checked.
![]() Time Saver:
You can also right click on the item and choose the catalog to use.
This saves you from having to open the material item dialog and then
save it when exiting the catalog.
Time Saver:
You can also right click on the item and choose the catalog to use.
This saves you from having to open the material item dialog and then
save it when exiting the catalog.
![]() To Insert
a New Material Line Item and Search the Catalog.
To Insert
a New Material Line Item and Search the Catalog.
![]() Important:
The first time you look up parts using the Napa Catalog, you will
require to link the software's vehicle card to the Napa vehicle card.
You will be prompted a dialog is provided with the existing vehicle
information to help. Right click on an existing line item within the
service package.
Important:
The first time you look up parts using the Napa Catalog, you will
require to link the software's vehicle card to the Napa vehicle card.
You will be prompted a dialog is provided with the existing vehicle
information to help. Right click on an existing line item within the
service package.
Choose either insert above or insert below depending on where you want the new item to appear relative to the item you selected in step 1.
Choose Supplied Item then Unsourced Part.
A new Update Material Line Item dialog will appear. Click on the NAPA Catalog button.
Either type in a text search in the Catalog Search field or navigate the Category/Group drop down menus on the right side of the window.
If the part is found in the local inventory, the I column box will be selected. If you do not have enough quantity to satisfy the application the checkbox will be magenta.
If the part is found at the supplier specified through online ordering, the O column box will be selected and your pricing from the supplier will be returned. The sell price defaults will calculate your selling prices if implemented. When the parts are found in the supplier's distribution center or warehouse, the O will display a magenta W. When the part is found at another store within their network, the O will display a blue N.
If the supplier has an alternate part for the application, it will be listed directly below the part you inquired on and will be blue in color.
Click on the part you require. The quantity will default to the PC (Per Car Quantity).
Click on Apply to update the work order with the part number, description and suggested selling price. If the part number is found in inventory the part will be drawn from inventory automatically.
![]() Tip:
There are three options available to you when applying parts to the
work order from the catalog. They are to copy
part descriptions, copy
parts pricing and copy parts
quantity. These options are located directly beneath the Catalog
Search field. By default, they are both checked.
Tip:
There are three options available to you when applying parts to the
work order from the catalog. They are to copy
part descriptions, copy
parts pricing and copy parts
quantity. These options are located directly beneath the Catalog
Search field. By default, they are both checked.
![]() To Search
for a Part (Stand Alone Catalog)
To Search
for a Part (Stand Alone Catalog)
Click the Parts Catalog shortcut.
Choose the NAPA catalog.
Either type in a text search in the Catalog Search field or navigate the Category/Group/Description drop down menus on the right side of the window.
The parts information will be displayed.
If the part description is underlined, additional information such as images. Simply click on the description to launch it.
![]() Part
Search Tour (Stand Alone Catalog)
Part
Search Tour (Stand Alone Catalog)
![]() To check
pricing and availability:
To check
pricing and availability:
Search for the parts in the catalog as per normal.
Click the box under the C column for each part your want to check. Or, click the heading box for the entire parts list.
Choose the online supplier from the Supplier
drop down list.
![]() When using the master list as a
supplier, only pricing is provided.
When using the master list as a
supplier, only pricing is provided.
Click on the Check Availability button.
If the part is found in the local inventory, the I column box will be selected. If you do not have enough quantity to satisfy the application the checkbox will be magenta .
If the part is found at the supplier specified through online ordering, the O column box will be selected and your pricing from the supplier will be returned. The sell price defaults will calculate your selling prices if implemented. When the parts are found in the supplier's distribution center or warehouse, a W will be displayed in purple.
If the supplier has an alternate part for the application, it will be shown in the comments next to the listed part.
Click Apply to return the part and pricing information back to the work order. The quantity will default to the PC (Per Car Quantity).
![]() To Search for a Part from an existing
material line item.
To Search for a Part from an existing
material line item.
On the Work Order editor screen, double click the Material Line Item to open the update material line item dialog.
Click the Catalog button on the toolbar to open the Catalog dialog. If CARQUEST is not your default catalog, click the drop down arrow beside the catalog button on the toolbar.
If you have a preset part search configured, the search term will automatically be inserted into the catalog search field. If not, type in a text search in the Catalog Search field or navigate the Category/Group/Description drop down menus on the right side of the window.
Click the binoculars icon to initiate the search.
If the part description is underlined, additional information is available. Information includes: pictures, OEM part numbers, specifications, warranty, etc. Simply click on the description to launch it.
If the part is found in the local inventory, the I column box will be selected. If you do not have enough quantity to satisfy the application the checkbox will be magenta.
If the part is found at the supplier specified through online ordering, the O column box will be selected and your pricing from the supplier will be returned. The sell price defaults will calculate your selling prices if implemented. When the parts are found in the supplier's distribution center or warehouse, the O will display a magenta W. When the part is found at another store within their network, the O will display a blue N.
If the supplier has an alternate part for the application, it will be listed directly below the part you inquired on and will be blue in color.
Click on the part you require. The quantity will default to the PC (Per Car Quantity).
Click on Apply to update the work order with the part number, description and suggested selling price. If the part number is found in inventory the part will be drawn from inventory automatically.
![]() Tip:
There are three options available to you when applying parts to the
work order from the catalog. They are to copy
part descriptions, copy
parts pricing and copy
parts quantity. These options are located directly beneath
the Catalog Search field. By default, they are both checked.
Tip:
There are three options available to you when applying parts to the
work order from the catalog. They are to copy
part descriptions, copy
parts pricing and copy
parts quantity. These options are located directly beneath
the Catalog Search field. By default, they are both checked.
![]() Time Saver:
You can also right click on the item and choose the catalog to use.
This saves you from having to open the material item dialog and then
save it when exiting the catalog.
Time Saver:
You can also right click on the item and choose the catalog to use.
This saves you from having to open the material item dialog and then
save it when exiting the catalog.
![]() To Insert a New Material Line Item and
Search the Catalog.
To Insert a New Material Line Item and
Search the Catalog.
Right click on an existing line item within the service package.
Choose either insert above or insert below depending on where you want the new item to appear relative to the item you selected in step 1.
Choose Supplied Item then Unsourced Part.
A new Update Material Line Item dialog will appear.
Click the Catalog button on the toolbar to open the Catalog dialog. If CARQUEST is not your default catalog, click the drop down arrow beside the catalog button on the toolbar.
If you have a preset part search configured, the search term will automatically be inserted into the catalog search field. If not, type in a text search in the Catalog Search field or navigate the Category/Group/Description drop down menus on the right side of the window.
Click the binoculars icon to initiate the search.
If the part description is underlined, additional information is available. Information includes: pictures, OEM part numbers, specifications, warranty, etc. Simply click on the description to launch it.
Click on the part you require. The quantity will default to the PC (Per Car Quantity).
Click on Apply to update the work order with the part number, description and suggested selling price. If the part number is found in inventory the part will be drawn from inventory automatically.
![]() Tip: There are three options
available to you when applying parts to the work order from the
catalog. They are to copy part
descriptions, copy
parts pricing and copy
parts quantity. These options are located directly beneath
the Catalog Search field. By default, they are both checked.
Tip: There are three options
available to you when applying parts to the work order from the
catalog. They are to copy part
descriptions, copy
parts pricing and copy
parts quantity. These options are located directly beneath
the Catalog Search field. By default, they are both checked.
![]() Using Interchange (Parts Cross-Referencing
Utility)
Using Interchange (Parts Cross-Referencing
Utility)
Interchange is used to cross-reference part numbers. This can be a useful tool if you have a competitive part that has been taken off the vehicle. An example might be an OEM belt or a Gates belt and your supplier stocks Dayco.
From the Parts Catalog Tab
Right click the part number.
Choose Interchange.
The part numbers that cross-reference to the selected part are displayed.
From the Interchange Tab
In the Search field, type the part number and then press enter.
The part numbers that cross-reference to the selected part are displayed.
Click on the part number for the application and then click Apply to return the information back to the work order.
Tire Fitment provides the standard tire sizes for the vehicle models, Lug Nut Torque Ft/Lbs, inflation and rim width.
Open the catalog and click the Tire tab. The standard tire fitment information for the selected vehicle will be displayed.
To search your inventory for tires in that size, select the tire size, right click and choose Search Inventory.
![]() Tip: The Software
can provide you with tire price lists from your tire supplier. Ask
your local representative for details.
Tip: The Software
can provide you with tire price lists from your tire supplier. Ask
your local representative for details.
When searching for parts an automatic ePartExpert to AAIA vehicle ID conversion will be performed and if successful that vehicle ID will be passed to Wrenchead automatically.
![]() To Search for a Part from an existing
material line item.
To Search for a Part from an existing
material line item.
On the Work Order editor screen, double click the Material Line Item to open the update material line item dialog.
Click the Wrenchead Catalog button on the toolbar to open the Catalog dialog.
Find all the parts you require according to the instructions provided to you by your parts supplier and add them to your order.
Click the Order Review tab to see your list of parts.
![]() Time Saver:
You can also right click on the item and choose the catalog to use.
This saves you from having to open the material item dialog and then
save it when exiting the catalog.
Time Saver:
You can also right click on the item and choose the catalog to use.
This saves you from having to open the material item dialog and then
save it when exiting the catalog.
![]() To Insert a New Material Line Item and
Search the Catalog.
To Insert a New Material Line Item and
Search the Catalog.
Right click on an existing line item within the service package.
Choose either insert above or insert below depending on where you want the new item to appear relative to the item you selected in step 1.
Choose Supplied Item then Unsourced Part.
A new Update Material Line Item dialog will appear. Click on the Wrenchead Catalog button.
Find all the parts you require according to the instructions provided to you by your parts supplier and add them to your order.
Click the Order Review tab to see your list of parts.
Click Copy & Return at the top left of the dialog to return your parts information to the work order.
![]() To Search for a Part
(Stand Alone Catalog)
To Search for a Part
(Stand Alone Catalog)
Click the Parts Catalog short cut.
Choose the Wrenchead catalog.
Find all the parts you require according to the instructions provided to you by your parts supplier.
![]() Wrenchead Catalog (08:00)
Wrenchead Catalog (08:00)
The WORLDPAC catalog is initiated from the Online Order tab of the work order dialog.
![]() Note: WORLDPAC also supports AConneX style online
ordering using the Epicor (formerly Activant) ePartExpert
and is the preferred integration type.
Note: WORLDPAC also supports AConneX style online
ordering using the Epicor (formerly Activant) ePartExpert
and is the preferred integration type.
![]() To Search for a Tire from an existing
material line item.
To Search for a Tire from an existing
material line item.
![]() Important:
The first time you look up tires using the Tire Center Catalog, you
will require to link the software's vehicle card to the Tire Center
vehicle card. You will be prompted a dialog is provided with the existing
vehicle information to help.
Important:
The first time you look up tires using the Tire Center Catalog, you
will require to link the software's vehicle card to the Tire Center
vehicle card. You will be prompted a dialog is provided with the existing
vehicle information to help.
On the Work Order editor screen, double click the Material Line Item to open the update material line item dialog.
Click the Catalog drop down button on the toolbar and then click on the Tire Center Catalog.
If you wish to use the tire specification tab, specify the vehicle. Once you set it, it will be remembered on subsequent lookups.
If you know the size of the tire, click the parts catalog tab and type the size in the size field and then press the ENTER key or click the Query menu button.
If you want to use the vehicle's Tire Specification to search for tires, click the Tire tab.
Right click on any of the sizes highlighted in yellow and choose Search Tire Center.
If the description is underlined, additional information is available by click on the description.
If the tire is found in the local inventory, the I column box will be selected. If you do not have enough quantity to satisfy the application the checkbox will be magenta.
If the tire is found at the supplier for the asking quantity specified through online ordering, the O column box will be selected and your cost will be returned. If you want an automatic selling price to be calculated as well, use the sell price defaults feature.
You can filter by Vendor by clicking the Vendor drop down menu and choosing a brand.
Click on the tire you require.
Click on Apply to update the work order with the part number, description and pricing. If the part number is found in inventory the part will be drawn from inventory automatically.
![]() Tip:
There are three options available to you when applying parts to the
work order from the catalog. They are to copy
part descriptions and copy
parts pricing. These options are located directly beneath the
Catalog Size Search field. By default, they are both checked.
Tip:
There are three options available to you when applying parts to the
work order from the catalog. They are to copy
part descriptions and copy
parts pricing. These options are located directly beneath the
Catalog Size Search field. By default, they are both checked.
![]() Time Saver:
You can also right click on the item and choose the catalog to use.
This saves you from having to open the material item dialog and then
save it when exiting the catalog.
Time Saver:
You can also right click on the item and choose the catalog to use.
This saves you from having to open the material item dialog and then
save it when exiting the catalog.
![]() To Insert a New Material Line Item and
Search the Tire Center Catalog.
To Insert a New Material Line Item and
Search the Tire Center Catalog.
![]() Important:
The first time you look up tires using the Tire Center Catalog, you
will require to link the software's vehicle card to the Tire Center
vehicle card. You will be prompted a dialog is provided with the existing
vehicle information to help.
Important:
The first time you look up tires using the Tire Center Catalog, you
will require to link the software's vehicle card to the Tire Center
vehicle card. You will be prompted a dialog is provided with the existing
vehicle information to help.
Right click on an existing line item within the service package.
Choose either insert above or insert below depending on where you want the new item to appear relative to the item you selected in step 1.
Choose Supplied Item then Unsourced Part.
A new Update Material Line Item dialog will appear. Click on the catalog drop down and choose Tire Center Catalog.
Click the Catalog drop down button on the toolbar and then click on the Tire Center Catalog.
If you wish to use the tire specification tab, specify the vehicle. Once you set it, it will be remembered on subsequent lookups.
If you know the size of the tire, click the parts catalog tab and type the size in the size field and then press the ENTER key or click the Query menu button.
If you want to use the vehicle's Tire Specification to search for tires, click the Tire tab.
Right click on any of the sizes highlighted in yellow and choose Search Tire Center.
If the description is underlined, additional information is available by click on the description.
If the tire is found in the local inventory, the I column box will be selected. If you do not have enough quantity to satisfy the application the checkbox will be magenta.
If the tire is found at the supplier for the asking quantity specified through online ordering, the O column box will be selected and your cost will be returned. If you want an automatic selling price to be calculated as well, use the sell price defaults feature.
You can filter by Vendor by clicking the Vendor drop down menu and choosing a brand.
Click on the tire you require.
Click on Apply to update the work order with the part number, description and pricing. If the part number is found in inventory the part will be drawn from inventory automatically.
![]() Tip:
There are three options available to you when applying parts to the
work order from the catalog. They are to copy
part descriptions and copy
parts pricing. These options are located directly beneath the
Catalog Size Search field. By default, they are both checked.
Tip:
There are three options available to you when applying parts to the
work order from the catalog. They are to copy
part descriptions and copy
parts pricing. These options are located directly beneath the
Catalog Size Search field. By default, they are both checked.
![]() To Search
and Order Tires (Stand Alone Catalog)
To Search
and Order Tires (Stand Alone Catalog)
Click the Parts Catalog shortcut.
Choose the Tire Center Catalog.
If you wish to use the tire specification tab, specify the vehicle.
If you know the size of the tire, click the parts catalog tab and type the size in the size field and then press the ENTER key or click the Query menu button.
If you want to use the vehicle's Tire Specification to search for tires, click the Tire tab.
Right click on any of the sizes highlighted in yellow and choose Search Tire Center.
If the description is underlined, additional information is available by click on the description.
If the tire is found in the local inventory, the I column box will be selected. If you do not have enough quantity to satisfy the application the checkbox will be magenta.
If the tire is found at the supplier for the asking quantity specified through online ordering, the O column box will be selected and your cost will be returned.
You can filter by Vendor by clicking the Vendor drop down menu and choosing a brand.
Right click on the tire you require.
Click Add To Order.
Specify the Quantity, flag it if it is urgent, and add a comment if required.
You are now on the Online Order tab. You can return to the Parts Catalog or Tire tabs to search for more tires and add them to the order as required.
Right click on existing items to update or remove them.
To place the order, click Tools | Order All.
The order is placed and a Purchase Order has been created in the Purchase Manager.
Right click on any line item on the work order and then click OnDemand5.
Choose:
TSB - Technican service bulletins
Repair - Repair information and instructions
Maintenance - Maintenance information & schedules
Estimate - Estimating guide.
Once part information has been applied to the work order, you can place the order for the parts as required. Please refer the Supplier Connection topic for instructions.